


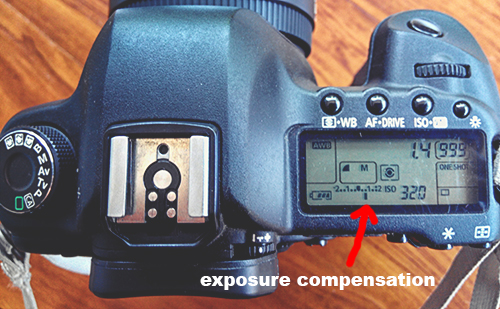
The use of control or button +/- on our DSLR camera is the simplest way to make an image look lighter or darker. This feature is in almost all cameras, be it digital or analog, amateur or professional cameras.
What is the simple definition of exposure compensation?
The simple description of this feature is that it allows you as a photographer to make your photo appear brighter (hi-key) or darker (low-key) easily.
Does every camera have the exposure compensation feature?
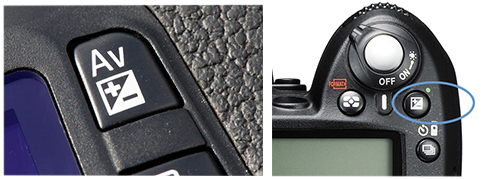
Most of them do. Actually this feature is a facility found DSLR cameras, compact cameras as well as top-level (high-end). Some cameras provide access to this feature on the outer knob of the camera while some of them require us to access the menu. As for the range of this feature, it is varied in every camera. Some cameras only provide the range of plus (+) 2 up to minus (-) 2, and for the high end cameras, it usually ranges + / – 5.
My camera provides exposure feature (automatic/semi-automatic), so what is the use of exposure compensation?
The digital camera is indeed equipped with a sensor to read the proportion (metering) with automatic exposure, and will find the exact aperture proportion and shutter speed in order to get good quality photos. Exposure Compensation allows us to correct the exposure proportions given by the camera’s metering system. Moreover, this feature can also be used for artistic purposes, for example to intentionally make our photos appear lighter or darker.
When do I need to use the exposure compensation feature?
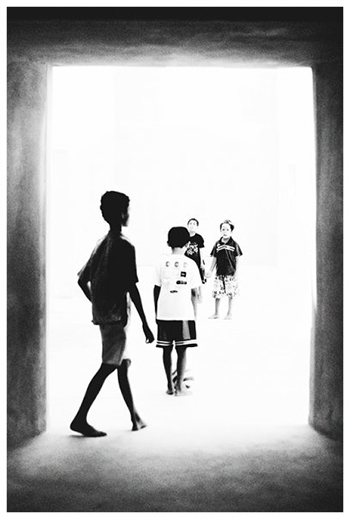
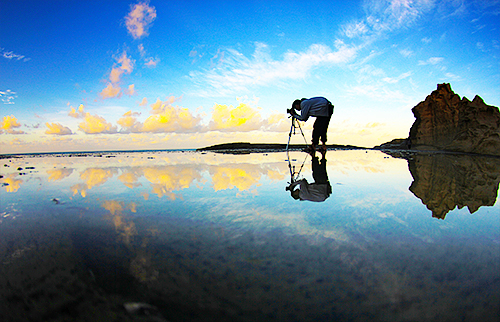
There are some situations where we cannot set the right and perfect lighting, especially when we take a shot with an exceedingly bright or dark background, so that the subject on the foreground appear too light or the opposite, too dark.
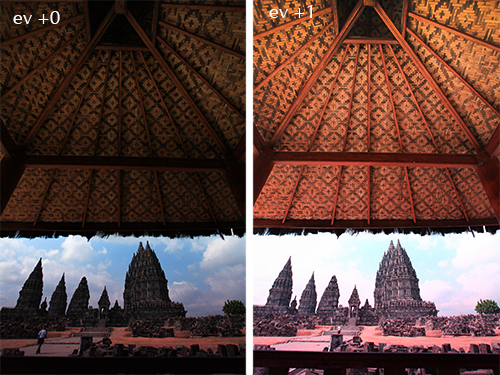
When we use + of the exposure compensation?
It can be varied depending on the subject and metering mode that you use. In a scene dominated by whites (bright areas), you can use +1, but sometimes +0.5 or +2 can be used as well. The subjects are very diverse. You can see the result of the photos taken without exposure compensation, then review them and see if they are not satisfactory. After that, you can shoot again using exposure compensation feature to get the desired results.
When you take an image of someone in a room while he stands in front of the window, the sunlight from the outdoors has the potential to turn the subject into a dark silhouette. Well, the Exposure Compensation can help you to adjust the exposure and ensure you that the lighting on the object is appropriate.
When do we need to use – of exposure compensation?
You can try to use it while shooting a music concert stage or theater performances. Usually, there are excessive lights from spotlights on the subject or the musician you want to take images from while the background (behind the singer) is totally dark. The dominating blacks can affect the metering to give incorrect calculations, and this will result images with too bright subjects (washed out), and the use of Exposure Compensation can reduce the intensity of light that enters the sensor which will finally save your photos.
Is there any other condition where the Exposure Compensation feature can be beneficial?
This feature can be incredibly beneficial when you shoot a scene or situation which is dominated by blacks or whites. Try to look carefully while you shoot a scene which is dominated by whites. The camera will tend to result under-exposed photos, then the camera will indirectly change the whites into grey.
Similar thing happens when you take a close up photo of a black colored subject. The photo result will tend to be lighter and grayish. All these situations can actually be solved by using Exposure Compensation feature on our camera.
It is important to be kept in mind: do not use this feature on automatic mode or mode scene like sport, landscape, portrait, and etc. instead, use it while shooting using mode Program (P), Aperture Priority (A or Av), and Shutter Priority (S or TV).
Nice exposure compensation explanation from AdoramaTV


