These photos interest you? And are you curious as to how they were taken? Like what camera was used, what filters, shutter speed settings, ISO? Or maybe you’re curious as to how it was edited in photoshop and what techniques were used to get these results? I will explain to you in detail and answer all these questions about how these photos were made.
Here are the secret ingredients:
– Camera: Canon EOS 550D
– Lens: Sigma 10-20 mm f/4-5.6 EX DG HSM
– Filter: Kenko UV HMC
– Tripod
And the above combination of gadgets were used with the following techniques:
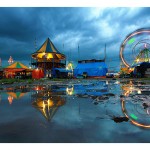
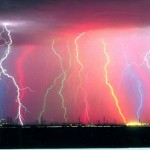
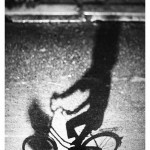
There really aren’t any special tricks used to create the above photographs. The above photos were shot during the night (this may be hard to believe, but yes, night time), during a full moon. The color temperature of the moonlight is similar to that of midday sunlight, because moonlight is reflected sunlight at a lower intensity. Therefore, slow shutter speed is needed to get the photo’s lighting effects. The advantage of taking photos during a full moon is that we can use slow shutter speeds without using an ND filter and we will get the same ambient lighting as that of an afternoon. The WB (white balance) setting that I used during the shoot was the Auto Mode, at 100 ISO, and a shutter speed of 30 seconds. Yes, it is a bit long. That’s why a tripod is a must-have for this type of photo shoot. It would also be great to use a shutter release cable to trigger your shutter. But because I didn’t have one of those, I used the timer on the camera instead. This slow shutter speed will blur any moving objects, and the movement of the clouds and seawater will create a certain dramatic affect to the photo. This exact reason is why this super slow shutter speed will not work for taking photographs of models and people. Well, I guess you could use this technique if your model could stand perfectly still for 30 seconds (but wow that would be quite a find, haha).
The above photographs were taken at the beach. And for taking pictures like these on the beach, do not position yourself and your tripod on the sand because sand erodes whenever it is hit by water waves. This movement of the sand will affect the stability of your tripod (and seeing as this is a 30-second long shot, you will need all the stability you can get). So, look for a stable place, e.g. surface of a rock or coral.
Quite simple, is it not? Sometimes unique photographs can be obtained during those times when people are rarely outside taking photographs. So step out of your comfort zone and explore your surrounding nature from a different point of view.


IMPORTANT:
Shooting at slow speeds, especially as long as 30 seconds will cause the camera sensor to heat up. If the sensor is heated at an extended amount of time, it will cause dead pixels to appear, i.e. pixels on the camera sensors not functioning in recording images. So let your camera cool down after you take a shot at slow shutter speed.