Architectural photography can be easy yet difficult. It is easy because the objects are not moving. And it is difficult because of the lighting on the object can be very dependent on the weather which is very unpredictable. Apart from that, the challenge lies on how we find good position and right angle so that the building looks more interesting and majestic. There are some tips and tricks on architectural photography from how to get good lighting, lens choices until how to get good angle while shooting:
1. Wake up early
To shoot architecture objects, you need more than a day, because it will be hugely dependent on the weather. Good architectural photo will be obtained when the sunlight drops exactly on the building with the support of clear blue sky in the morning or afternoon. It gets fierce during the day and when it gets windy. Apart from that, the perfect time to shoot is the “blue hour” where the sky looks blue before it gets dark (evening).
2. Use wide lens
It is very hugely needed in order to capture the building as a whole. When we use standard lens/kit, we cannot get the image of the whole building (it gets cut). The recommended wide lens ranges from 12 to 18 mm. if you use a camera with fixed lens which is not so wide or if you use Smartphone, you can apply the panorama feature. If you do not have it, you can go forward or backward so that the image of the whole building can be taken.
3. The building detail
To shoot a building, we need to capture its detail sharply. Use F/14 aperture for example, to obtain the building detail properly. The smaller the diaphragm, the sharper the photo resulted. But there is an exception for the f/11 and f/12. On that diagram position, a “light dispersion” happen instead which can make the image losing its focus.
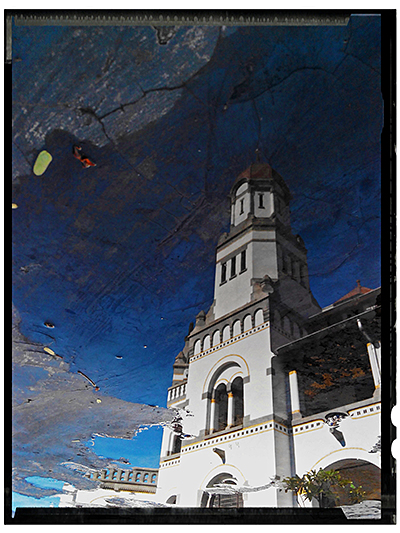
4. Add another element
When you feel you only take standard images of buildings, you can try to find new angles. You can explore it and find unique angles. It can be variety of angles like one taken from a reflection of stagnate water or lake around the building. Adding reflection can make your architectural photo looks interesting.
5. Increase the scale
Buildings commonly have high and majestic shapes. In order to know how huge the building is we can use a scale by letting a person to stand exactly in front of it. We can wait for those people until we get the moment where tourists or travelers pass the building. You can also add cultural attraction and dance and make the building as the background then the image will look more dramatic.
6. Learn the history
Before you shoot a historical site or building, try to find out about its historical background. By knowing the information on its history, there will be an urge to know more about it and explore every unique and iconic corner of the building like the windows, the roof, the gate, and etc.
7. Distortion
Commonly, the building will be so high and majestic; shooting it with wide lens closely will make it distorted by the lens. This kind of distortion indeed has something to do with taste. For most photographers, this can make their images look dramatic that is why they like it. For you who dislike it, you can use “tilt shift” lens instead. But this type of lens can be very expensive. You can also fix this problem using adobe Photoshop which is cheaper.
8. Photo quality
To get the best quality in shooting building, use low ISO for example 50 to 100 ISO in order to reduce the noise as much as possible. Moreover, use RAW file instead. If there is no RAW in your camera, you can set it to fine JPEG (the best). To shoot a building, you need good detail and sharpness. These two technical ways can help you create photos with better qualities.
9. Tripod
Use tripod so that you can get details with the use of small aperture like F/14. Tripod can be used to create HDR photos as well (combining several photos with different lighting into one). If the weather is not so good, you can use this HRD technique by bracketing the combining of the 3 photo techniques (photo over +1, normal, under -1). Then after that, you can combine the images in Photoshop. Remember to use this technique as the last option when you cannot get good images because of the bad weather and you got only one day there. No matter how, good images are ones created on the location.
OK, hope all these tips beneficial for you and have a nice try.