Waterfalls seem to grab the hearts and minds of people. Go to any location that has one or more waterfalls and it is pretty much a guarantee that they will be a major attraction, if not the main attraction, of the area. However, as beautiful as waterfalls are, it is not so easy to capture that beauty with a camera. It is easy to produce pictures of waterfalls; it is not so easy to produce powerful images. Waterfalls do present themselves as a wonderful and challenging subject matter to photographers. Firstly they’re beautiful places, secondly they are often in tricky lighting situation and thirdly they’re a dynamic subject as they’re moving (and of course movement means a challenge but also a real opportunity for a more dynamic shot).
Waterfalls provide their own unique set of problems which requires a unique set of solutions.Here are 10 simple but very effective tips that will help you to take better waterfalls pictures.
1. Weather
Many waterfalls are found in forest, or in heavily wooded areas. That means the same rules of lighting that apply to forest photography also apply to waterfall photos. Cloudy and overcast days are ideal for photographing waterfalls. This helps make the scene darker and the low light conditions affect exposure by slowing down shutter speed.
Don’t shoot waterfall photos in bright light i.e., in the mid-day. Bright light can create high contrast and this will overexposure white water and underexposure dark shadows. It’s also difficult to get proper slow shutter speed on bright light even with using ND filters and small aperture.
Early morning or late evening is also a good time for taking such pictures as the Sun has gone behind the trees. Early or late hours will also “remove”
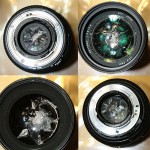
2. An Old Filter
One of the major challenges in photographing waterfalls has to do with water getting on the lens (or the filter in front of the lens). Powerful waterfalls can drop huge amounts of water which produces a mist. In other cases, the weather may produce fog, drizzle, or rain that gets on the lens. All of this can be exacerbated by wind (which always seems to be pointed directly toward my lens).
A partial solution is to place an old, clear filter in front of the lens while the equipment is being set up. Once the photographer is ready to go, the photographer will need to remove the filter from the lens in order to take the shot.
3. Tripod
Don’t even think of photographing a waterfall without a tripod. A large part of the nature of waterfalls is the movement of the water. This movement is most often captured with shutter speeds that are slow enough that clear images can not be produced with a handheld camera. We’ve all taken photographs that were ruined by blurriness, which is why this tool is essential for photography. You’ll often see serious photographers carrying tripods around to ensure their photos don’t suffer from the camera shake – especially long exposure photographs (i.e. night time photography, waterfall photography, etc). The tripod also has the added benefit of allowing you to take photos of yourself without needing someone else to take the photo for you (you’ll need to know how to set up the camera’s self-timer feature to do this though).
4. White Balance
The lighting involved with waterfall shots can be tricky. In overcast or rainy conditions, the light will likely have a blue tint. If the waterfall is in a forest, the light may bounce off the trees and pick up a green tint. Neither the auto white balance nor the preset white balance options on a camera will guarantee accurate white balance. The best solution is to perform a manual white balance (your camera manual will explain how for your particular camera).
5. Polarizer
Objects that are wet tend to produce glare. This glare is often polarized. This is particularly an issue with waterfall shots because the rocks and vegetation near the waterfall will be wet and will almost certainly have a certain amount of glare. A polarizer will remove the glare. In addition, a polarizer has a secondary effect.
Circular Polarizer: The role of the polarizer is to cut out glare and reflections caused by the sun. Most people who wear polarized sun glasses will notice the difference in the clarity of what they see and thus have already seen the benefits of the polarizer. The circular aspect of the circular polarizer basically means you can adjust the degree of polarization by rotating the filter until you get see a suitable setting through the view finder or LCD. Through this filter, you’ll see your subjects “jump out” more as the contrast between the subjects and the background is further increased. You may also notice bluer skies as well as more vibrant colors in the polarized image. If you’re fortunate enough to have a rainbow in your photo, you may be able to enhance the rainbow.
Now it’s also possible to overdo the polarization like making the skies too dark or getting rid of the rainbow in your photograph. There are also situations where the polarizer won’t help you like if you’re looking against the sun. A polarizer also won’t help you much if it’s overcast.By removing the glare, the color saturation will improve.
6. Composition
Identifying and capturing strong composition is an extremely important part of creating powerful waterfall images. While the purpose of this article is not to carry out a thorough review of composition, a couple of aspects of composition, curves and environment, will be covered.
Curves can make or break a waterfall image. With waterfalls, two types of curves are particularly important. The first type of curve is the curve formed by the water. Waterfalls that have water that flows or falls in such a way as to form curves tend to create much more interest than waterfalls where the water simply falls straight down. In essence, graceful curves add an element of elegance to a waterfall. The second type of curve is any curved object that points toward the waterfall. This type of curve will repeatedly direct the attention toward the waterfall and strengthen it as the center of interest.
The second major component of waterfall composition, covered in this article, is the environment surrounding the waterfall. This is extremely important to many waterfall shots. By itself, falling water is not always that interesting. Rather, it is the surrounding environment that gives waterfalls much of their character. Therefore, why not include some of that environment in the image to bring out the waterfall character. The surrounding rocks, trees, and vegetation can make the waterfall image come alive.
Also on my week of photographing waterfalls I learned that a waterfall could be photographed from many angles and in many different ways ranging from the wide angle shot that puts the waterfall into it’s wider context right down to tightly cropped shots that focus upon just one small part of the waterfall. Also look for the different ways the water flows. In some places it’ll be multiple streams, in others it will gush explosively everywhere and in others it will flow gently in a single stream. Try a variety of positions on the waterfall (you’ll find that it’ll flow at different speeds in different sections also) and experiment with how the different parts look at slow shutter speeds.
7. Shutter Speed
What shutter speed should be used to blur the falling water? That seems to be the first question that people usually ask about shooting waterfalls. However, there is no such thing as one correct shutter speed for shooting waterfalls! Rather, the proper shutter speed is a function of five factors.
The amount of blur desired
The volume of water
The speed of the water
The distance between camera and water
The direction of water flow with respect to the lens
Use a slow shutter speed is the most important tip for shooting waterfall photos. The slower shutter speed settings making the waterfalls look “professionally” – smooth and silky. The longer the shutter speed you select, the more pronounced the effect will be.
You also have to compensate slow shutter speed by selecting small aperture and because of that you will also get greater depth of field, thereby allowing the maximum amount of focus in your composition.
The slow shutter speed is a very relative term and it depends on the waterfall you are shooting. For big waterfalls with large water volume some times the 1/30 or 1/15 seconds shutter speed is enough. But for small streams with slow water you need to use much longer shutter speed to achieve the same effect – something like 10 seconds end even longer. Experiment and try out various speeds to see what works best for each image.
8. Exposure
Getting the right exposure can sometimes be a challenge when photographing waterfalls. Probably, one of the biggest problems is that it is easy to clip the highlights in the water. What this means is that the detail in the water is lost, and the water becomes just a big area of pure white. When this happens, the water just doesn’t look very real. The solution for this problem is to take a test shot of the waterfall and check the histogram on the monitor of your digital camera. If the histogram is cut off on the right side, the highlights have been clipped. If this is the case, the exposure needs to be decreased.
9. Aperture Priority Mode
If you are still having trouble with exposure even at darker times of the day and with the use of a polarizing filter another approach that you can take is switch into Aperture Priority Mode and choose the smallest aperture possible. On most cameras this will be f/22 or f/36. The result of choosing this is that your camera will automatically choose the longest shutter speed available for that aperture. It may not be 2 seconds – but it will almost always be longer than the shutter speed in that first control shot that you took and as a result the water will blur more than in the first shot. The other impact of having a smaller aperture is that you’ll have a larger depth of field and more of the waterfall will be in focus.

10. Get out and Experiment
That’s enough theory – now it’s time to get out and do it because the more you do the better you’ll get. Have fun!