Histogram is a feature in a DSLR camera that is often under-utilized by its users because of lack of understanding as what and how this histogram function works. Histogram, in general, can be viewed on the LCD screen by pressing the “info” button located next to the screen. Read on to learn more about what histogram informs the users about their photographs.
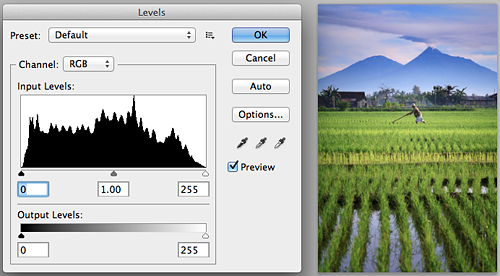
The X axis in the histogram illustrates the level of brightness/contrast ranging from totally black (level 0) to totally white (level 255), and therefore there are 254 levels of contrast in between. The & axis illustrates the pixel distribution in each level of said contrast.
Generally, a good photograph has a hill-shaped histogram with no cut-offs at the edges and at the peak of the hill shape. I say “in general” because there are some types of photographs (like a high-key, low-key, or night shot) where the histogram does not form this hill shape.

If a histogram showcases some cut offs at the tops of the hill shape, that means the dynamic range (level of contrast) of the photograph surpasses the dynamic range that is recordable by the sensor of the camera. If we force the camera to take a photograph in this condition, then the photo will appear too contrast; there can even be white lines visible on the borders where a light area meets a dark area of the photograph. In such situations, we would need a Graduated Neutral Density (GND) filter to lessen the brightness of the brightest area so as to be able to adjust the dynamic range to suit the sensor of the camera.
An example of a histogram of a photograph with a dynamic range that surpasses the capabilities of the camera sensor:

On the opposite end of the above condition, on histograms that has “hill” edges far from the ends of the X axis, the photographic settings doesn’t optimally utilize the dynamic range recording of the photograph. The resulting photo will appear dull and lacking contrast. This condition can still be helped during the post-editing process, but there will be gaps on the contrast level. If there are too many of these gaps, it’ll result in a poster-like rough image.
Example of a histogram with a short dynamic range:

The above histogram is then fixed digitally, creating the new histogram below:

In under-exposure instances, the histogram will show a “clipping” on the dark areas. Clipping: the peak of the histogram is cut off or is rough. If clipping happens, then the detail of the image in that contrast level disappears and can’t be helped by any digital processing. On the following histogram example, the details of the dark areas disappear.
Example of an under-exposed photograph histogram:

On the opposite end of the spectrum, over exposures will create clippings on the bright areas (right side of the histogram). In such instance, the detail in the bright areas disappear and can’t be saved by digital processing.
Example of a histogram of an over-exposure photograph:

As we evaluate our results on the DSLR’s LCD screen, don’t just pay attention to the photograph shown. This can fool us into thinking the results turned out fine (especially on overly bright or overly dark conditions) where there are actually flaws. Also pay close attention to the histogram to avoid any regrets.
How do you fix a histogram? The result of the histogram depends on the exposure (combination of aperture, shutter speed, and ISO) and unfortunately the exposure as a result of automatic metering by the camera doesn’t always give the best exposures. By paying attention to the histogram, we can know when manual toggling needs to be done to compensate for lack of better exposure or if a GND filter needs to be used.
Generally speaking, if a histogram shows a clipping on the dark end of the spectrum, then that means an under-exposure happened and you’d need to do a positive compensation on the exposure settings (+1/3, +2/3, or higher as is needed). The bigger the cut-off portion, the bigger the exposure compensation.
And vice versa, where the clipping happens on the bright areas, then you must under-compensate and set the exposure at a negative value (-1/3, -2/3, or lower as is needed).
If the dynamic range exceeds the sensor’s maximum dynamic range, then you’ll need to use a GND filter to lessen the contrast of the bright areas.
Little histogram flaws that occur, if not too extreme, can still be helped in the digital post-processing edits by toggling on the levels.
Histogram Explanation from Adorama TV on YouTube:


