The most common mistake made by beginners in photography on composition is the placement of horizon line which is not balance and other lines are inharmonic. Actually it is a very simple thing but if we pay more attention to it, it will give a great effect on the resulted picture.
Why does balance and straight line become so important?
Why is a balance horizon line important? Naturally, human eyes will prefer to see balance lines than the aslant or tilted ones. Just look at the pictures hanging on the walls in your living room, you must want the upper frame to be in align with the ceiling. You must also want you floor to look parallel and neat or your TV stands straight and not sideways, up or down. It is a very natural thing and when we see an image with unbalance horizon line, our eyes will naturally make an appraisal.
One’s eyes will always try to find visual balance on everything he sees including photography. That is why horizon line which is unbalance or not straight will appear unnatural. We need to focus on not only the main subject but also the areas both foreground and also background. This applies not only for landscape photography but also portrait and the others.
An example case of portrait photography
Look at the following wedding photo. Basically, it is a very interesting image but when we look at the horizon line of the ceiling, we will see clearly that the line is not straight and appears unnatural. If we deal with such problem we can fix it using adobe Lightroom/Photoshop.

After we are done with the editing, the picture will look better and balance. Straight and parallel lines will give better visual effects.

An example case of landscape photography
Let us see another example of landscape photography:
Although we have tried to keep the horizon line straight, it is possible that we still make those aslant lines just like the following image:

After we do some editing, the result will be very apparent and it will absolutely give positive effect on the final result.

Obtaining straight line using your camera
If you want to get good straight and parallel lines using your camera without going through post processing, we need to pay attention to the area around the subject. See if there is a straight line. Apart from that, we may also turn on this option on your view finder grid or perhaps the rule of third. This option will be different in canon and Nikon camera. Most cameras are facilitated with this feature but usually the name is different in each brand. In Nikon, you may access the following order: menu-shooting/display>viewfinder grid display. On some other newest DSLR cameras, there is a feature called “virtual horizon” that will appear on the LCD. This feature helps photographers to get a completely straight horizon line.

To align using Adobe Lightroom
The process of aligning horizon line is very simple and easy. You just need to enter “Develop Module” and then click “crop overlay” the icon above “basic” sub module. You may also click the button “R” on your keyboard to view the same window. When the window “crop and straighten” turns up, a ruler-like icon will appear with the word “angle” preceding it. So when we click that icon, the ruler will get activated and we are ready to straighten the image.
Using water level to align
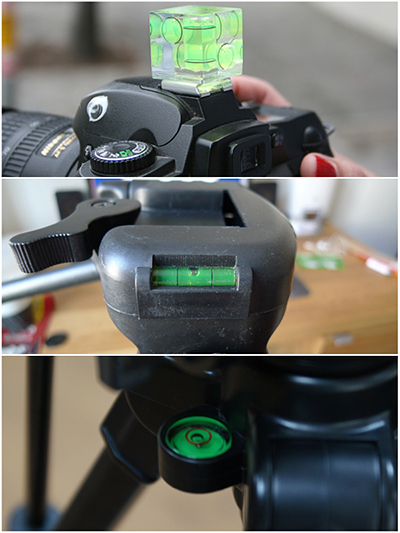
Water level is a camera accessory that we can buy to help straighten the horizon line. There are so many levels available both in big and small sizes. Inside the level, there is a bubble that will notify when the horizon is completely straight. Commonly, some tripods feature this instrument.
