Since the digital age introduced itself to cameras, photography has become more intriguing and definitely more enjoy, for both hobbyists/enthusiasts and professionals. With the increasing number of people pursuing this hobby, one of the most joyous effects is that cameras have become progressively cheaper. But these cheap price tags of camera did not include the decreasing price of camera lenses. On the contrary, it has since become relatively more expensive. One solution to cut your spending on lenses is to use older-issued manual focused lenses on your DSLR body. You may wonder if this is at all possible, and the answer is a definite “yes.” Using a rather cheap lens adapter, you can mount your lenses onto your DSLRs. Better yet, for those using Nikon DSLR models, these older manual focused lenses has the same exact mount, so no adapters necessary.
Easy ways to use manual lenses on DSLRs:
1. Do not forget to set the viewfinder diopters
Before taking photos using a manual lens, it is very important to set the diopters on the viewfinder. Adjust the diopters by peering directly into the viewfinder, especially for those of you with non-20/20 eyesight. This is important because when photographing using manual lenses, thoroughness in judgment via your eyesight is a major factor in producing a successful photograph.

2. Use adapters with an AF (auto focus) Confirm
Nikons are cameras that have an AF system confirm body. So even if we use manual lenses, as we toggle the focus on the lens, the DSLR body will give the double beeps as the focus signal. Cameras of other brands, however, do not have this feature. So to compensate, an adapter with a special chip allowing for AF confirm is needed. This feature will allow the camera to be able to inform the user if the lens has reached the desired focus point. This lens adapter can also be used as a “connector” for the lens, so it’s possible to fit the mount of the camera body of a different brand. A few lens adapters available on the market are lens adapters for:
– M39 – EOS
– M42 – EOS
– Nikon Ai – EOS
– Pentax PK – EOS
– Contax C/Y – EOS
– OM – EOS
– Leica R – EOS
– Rollei – EOS
– M39 – Nikon
– M42 – Nikon
– M42 – Sony
– M42 – 4/3
– Pentax – 4/3
– Nikon Ai – 4/3
– OM – 4/3
– C/Y – 4/3
– Leica R – 4/3
– MD – 4/3
– M39 – NEX
– M42 – NEX
– C mount – NEX
– Pentax – NEX
– MD – NEX
– Nikon F – NEX
– EOS – NEX
– Leica R – NEX
– C/Y – NEX
– FD – NEX
– C mount – m4/3
– M39 – m4/3
– M42 – m4/3
– Nikon F – m4/3
– Nikon G – m4/3
– Pentax – m4/3
– EOS – m4/3
– C/Y – m4/3
– MD – m4/3
– OM – m4/3
– Leica M – m4/3
– Konica AR – m4/3
– Leica R – m4/3
– FD – m4/3
– FD – EOS
– MD – EOS

3. Replacing the focusing screen
In analogue photography, we use a feature called a “split focusing screen” to aid in the process of focusing. This focusing screen divides an object into two parts; and if the object is at the right focus, the vertical lines of the object in both parts’ view will converge into a straight line. This technology is no longer used in DSLR cameras. However, when using manual lenses, this technology may still come in handy. To be able to use this “split-focusing screen,” we can replace the existing focusing screen with this split screen. It’s quite easy to do, but if you’re unsure in conducting this on your own, you should definitely consult a trusted professional. Use high quality brands such as KATZ EYE to ensure optimal accuracy.


4. Use the Live View feature of your DSLR
With the development of digital camera technology, almost all DSLR cameras come with the “live view” feature. Photographing using this live view mode is the easiest way to produce sharp images when photographing using manual lenses. By using the live view mode, you can see first hand how the photo will actually turn out on your camera’s LCD screen. But the downside, this drains the battery power much faster and there’s also a shutter lag (a response lag when the shutter is pressed).
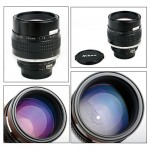
5. Utilize the distance window of the lens
If we pay close attention to the camera lens, there’s a kind of “window” on the lens containing numbers with a certain distance unit. That’s what is referred to as a “focus distance window.” Position the digits on the lens according to the distance between you as the photographer and the object. By doing this, without even peering through the viewfinder, you can produce sharp photographs. This, however, is only effective when using wider-type lenses, where these wide lenses have a wide DOF area. This method is ineffective when using a telephoto lense because of its narrow DOF (Depth of Field).