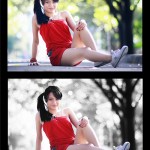
In this second part, we’ll learn how to create the selective color photography effect in easier steps. This 2nd way is accomplished by merely sliding parameters and saturation settings. Here’s how:
1. Open the file on photoshop then on the tool bar, go to IMAGE >> HUE and SATURATION

2. In the hue and saturations window, notice the drop-down menu titled “master” with options of various colors.

3. Choose the colors you still want to portray in the photograph. For this example, the RED colors are what we want to keep, so set saturations at -100 for colors other than red.

4. When all the unwanted colors are eliminated, the result will look like this:

Photoshop Tips: Selective Color Photography Part 1