If you’re a photographer and has an eye condition which requires you to wear glasses, it can sometimes get inconvenient to peer into the viewfinder. The glasses can get in the way in getting the precise sharpness on the objects. Here are some tips to resolve that issue.
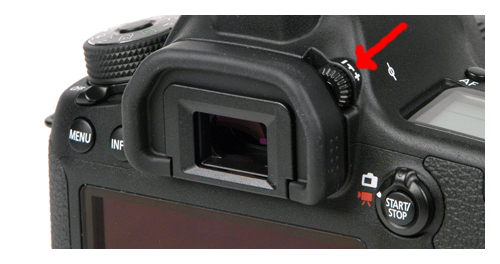
If you want to achieve precision through the viewfinder’s optics and without the need of your glasses to boot, make use of the diopter dial of your DSLR camera located on the camera’s viewfinder. This diopter dial adjusts the focus of the viewfinder in accordance with the state of the normal eye. If you are near-sighted (-) then you can turn the diopter to the negative (-) position to a position where you can see the view clearly and sharp. If you’re far-sighted, then you’ll need to turn it towards the positive (+) until you find your focus point. Keep in mind though that this feature has its limits. If you have severe near-sightedness (maybe a -7) or far-sightedness, then your focus point will surpass its limit. You’ll still need your glasses then. Or, for comfort, wear a contact lens instead when photographing.
The settings on the diopter won’t affect the image end-product at all. This dial will only help you gain focus, so you’ll be able to see as you would a normal 20/20 eye when peering through the optical viewfinder.
What you’ll need to do to correctly set the diopter is:
-Place the camera on a stable place, like mounted on a tripod for example.
-Half-press the shutter button until the camera finds the focus point (with auto focus on, of course). This is usually signaled with a beep sound.
-Once the camera finds its focus, peer through the viewfinder.
-Now turn the diopter dial slow until the view looks sharp to you.
-If you’re wearing glasses, take them off before adjusting the diopter to get the best view.
Simple enough, right? This simple feature can really do wonders in helping you take that sharp photograph, especially if you have a far-sighted or near-sighted eye condition.


